Deploy scalable WordPress* on Kubernetes* with Clear Linux* OS containers
07 Nov, 2019
By Qi Zheng and Rusty Lynch
This proof of concept describes how to deploy a scalable WordPress instance on a Kubernetes cluster with Clear Linux OS-based containers.
Kubernetes is an open source orchestration system for automating deployment, scaling, and management of containerized applications. It groups containers that make up an application into logical units for easy management and discovery.
WordPress is a popular free and open source blogging tool and a content management system (CMS). It is a service based on a popular components of a web hosting stack including a web server, PHP, and MySQL. The components in the WordPress stack include:
- PHP: WordPress is an application written in PHP.
- MySQL: WordPress requires a SQL database to persist and maintain data, it is usually MySQL or MariaDB.
- Web server: WordPress must be installed on a web server, like Apache or NGINX, to serve as a network host to be accessed by users.
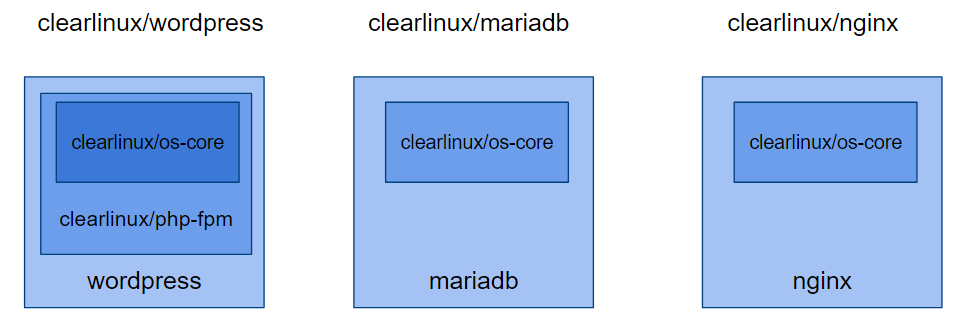
To deploy WordPress on Kubernetes, it helps to remember that containers are the fundamental components of an application. Clear Linux OS provides size-, performance-, and security-optimized containers on DockerHub. Three container images are available that include the necessary components for building out the WordPress service.
The details on how to implement Clear Linux OS containers can be found on GitHub*.
Prerequisites
This tutorial assumes you have a Kubernetes cluster with three nodes running Clear Linux OS, which can be bare metal or virtual machines. One functions as the master node and the other two function as worker nodes in the Kubernetes cluster.
- For detailed instructions on how to install Clear Linux OS, see the Clear Linux OS getting started documentation.
- For a detailed guide on how to set up Kubernetes, see the documentation on setting up a Kubernetes cluster with Clear Linux OS.
Shared storage, such as NFS, is required to enable scalability across the Kubernetes cluster. Install NFS support on each node by installing the nfs-utils bundle.
$ sudo swupd bundle-add nfs-utils
Verify the health of the Kubernetes cluster before continuing:
$ kubectl get node
NAME             STATUS   ROLES    AGE    VERSION
clr-worker1      Ready    <none>    1h   v1.15.2
clr-worker2      Ready    <none>    1h   v1.15.2
clr-master       Ready    master    1h   v1.15.1
Scalability philosophy
Scaling WordPress
Scaling cloud-native-designed applications becomes relatively straightforward since they are designed with decoupled components (commonly referred to as a microservice), using data that is persisted and synchronized across multiple replicas. Because of this architecture, scaling largely involves spawning additional instances of a component with a LoadBalancer placed in front to distribute the incoming load evenly across backend containers. Since WordPress not a cloud-native application and is a traditionally-designed application by default, scaling it is trickier, but still doable.
Wordpress has persistent data in two locations that require consideration when thinking about scaling: the data in the database and the content on the web server. Typically, the database and web server are close to each other, if not on the same disk on the same server. In this design, multiple instances of the WordPress application communicate with the same database and web server instances, although they may not be on the same host. When scaling the WordPress service, the WordPress application layer should be focused on.
Scaling Kubernetes
With this type of architecture, shared persistent storage is imperative to achieving the flexibility for scaling. The ReadWriteMany (RWX) Access Modes for Kubernetes persistent volume should be used to make sure replicas in different nodes can access the same volumes. nfs-provisioner is a module that simplifies dynamic storage provisioning on Kubernetes nodes that provide the persistent volumes for the WordPress cluster.
The following diagram shows a summary of the WordPress cluster on Kubernetes. Green lines indicate the interaction between pods and orange lines indicate the interaction between pod and persistent volume.
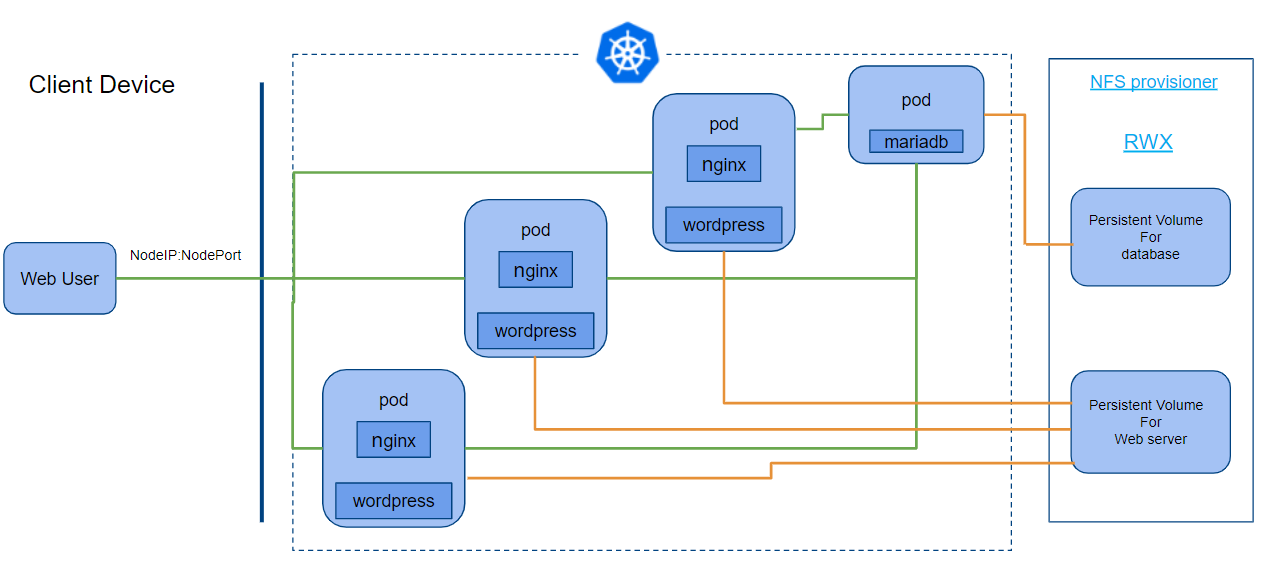
In this example, the service is exposed with NodePort and the WordPress application can be accessed in a browser by simply navigating to: http://$NodeIP:$NodePort
NodePort depends on IPtables on the Kubernetes node to randomly select a destination target pods. For details, refer to the doc: Kubernetes Services – exposing an application with NodePort.
Deploy on Kubernetes
The YAML files used to deploy Wordpress components on Kubernetes are all available in the Clear Linux OS Dockerfiles repository. Use these files as reference templates, they are not for production.
Prepare the NFS persistent volumes
The details of setting up networking and storage for NFS depends on your operating environment and is beyond the scope of this tutorial. This design follows the example in nfs-provisioner with minor customization.
- Enter the commands:
$ kubectl apply -f rbac.yaml
$ kubectl apply -f nfs-deployment.yaml
$ kubectl apply -f pvc-nfs.yaml
- Confirm the bounded persistent volumes and claims with the commands:
$ kubectl get pvNAME                                       CAPACITY   ACCESS MODES   RECLAIM POLICY   STATUS   CLAIM            STORAGECLASS   REASON   AGE
pvc-b3ff50cf-56c0-4487-8255-33d7785b6aec   500Mi      RWX            Delete           Bound    default/pvc-wp   example-nfs             34s
pvc-d24ba4d2-3020-48ec-a660-f57d3a76b2e6   500Mi      RWX            Delete           Bound    default/pvc-db   example-nfs             34s

$ kubectl get pvc
NAME     STATUS   VOLUME                                     CAPACITY   ACCESS MODES   STORAGECLASS   AGE
pvc-db   Bound    pvc-d24ba4d2-3020-48ec-a660-f57d3a76b2e6   500Mi      RWX            example-nfs    49s
pvc-wp   Bound    pvc-b3ff50cf-56c0-4487-8255-33d7785b6aec   500Mi      RWX            example-nfs    49s
In this example, the pod is “randomly” assigned to one worker node clr-worker1, all the final database and web host content are persistent in that node.
Note: In this example, the NFS pod is not assigned to one dedicated node (which is best for persistent data performance). If you want to assign a pod to a node, please refer to Assigning Pods to Nodes for details.
$ kubectl get po -o wide
NAME                               READY   STATUS    RESTARTS   AGE     IP             NODE             NOMINATED NODE   READINESS GATES
nfs-provisioner-76957d5487-72twp   1/1     Running   0          4m37s   10.244.1.173   clr-worker1   <none>           <none>
Deploy database and WordPress
Create secret password for database
The database requires a password. The user defaults to root in this example.
- Use the command shown below to generate a password. The password
clearlinuxis used below just as an example. Always follow password policy best practices.
$ echo -n "clearlinux" | base64
Y2xlYXJsaW51eA==
- The
secret.yamlfile contains:
apiVersion: v1
kind: Secret
metadata:
  name: mysql-pass
type: Opaque
data:
  password: Y2xlYXJsaW51eA==

$ kubectl apply -f secret.yaml
- With this
mysql-passsecret, MariaDB and WordPress can get the password and pass it to MariaDB as environment variables. Here is an example of the part in wordpress-deployment.yaml.
    - image: clearlinux/wordpress
        name: wordpress
        imagePullPolicy: IfNotPresent
        env:
        - name: WORDPRESS_DB_HOST
          value: wordpress-mysql
        - name: WORDPRESS_DB_PASSWORD
          valueFrom:
            secretKeyRef:
              name: mysql-pass
              key: password
- To expose the WordPress service to users, you must choose ServiceTypes. Choose NodePort. (The type LoadBalancer is not the proper choice, because it is not running in a CSP environment.)
apiVersion: v1
kind: Service
metadata:
  name: wordpress
  labels:
    app: wordpress
spec:
  ports:
    - port: 80
      nodePort: 30180
  selector:
    app: wordpress
    tier: frontend
#  type: LoadBalancer
  type: NodePort
- Deploy using the commands:
$ kubectl apply -f mysql-deployment.yaml
service/wordpress-mysql created
deployment.apps/wordpress-mysql created

$ kubectl apply -f wordpress-deployment.yaml
service/wordpress created
configmap/nginx-config created
deployment.apps/wordpress created
- Check the pod status:
$ kubectl get po -o wide
NAME                               READY   STATUS    RESTARTS   AGE     IP             NODE             NOMINATED NODE   READINESS GATES
nfs-provisioner-76957d5487-72twp   1/1     Running   0          68m     10.244.1.173   clr-worker1   <none>           <none>
wordpress-866d67dc78-5j2jz         2/2     Running   0          3m35s   10.244.6.4     clr-worker2       <none>           <none>
wordpress-mysql-6fbd666f76-d264f   1/1     Running   0          3m42s   10.244.6.3     clr-worker2       <none>           <none>
The database and WordPress are both deployed on node clr-worker2.
Set up WordPress
- Create an address to let users access this deployed WordPress service. Since it is NodePort service type, use the following commands to get the format
IP:Port.
$ kubectl get -o jsonpath="{.spec.ports[0].nodePort}" services wordpress
30180
$ IPAddr=`kubectl get nodes -o jsonpath="{.items[0].status.addresses[0].address}"`
-
This example returned the address,
http://$(IPAddr):30180. Open a browser and input this address. The page shown below is displayed.
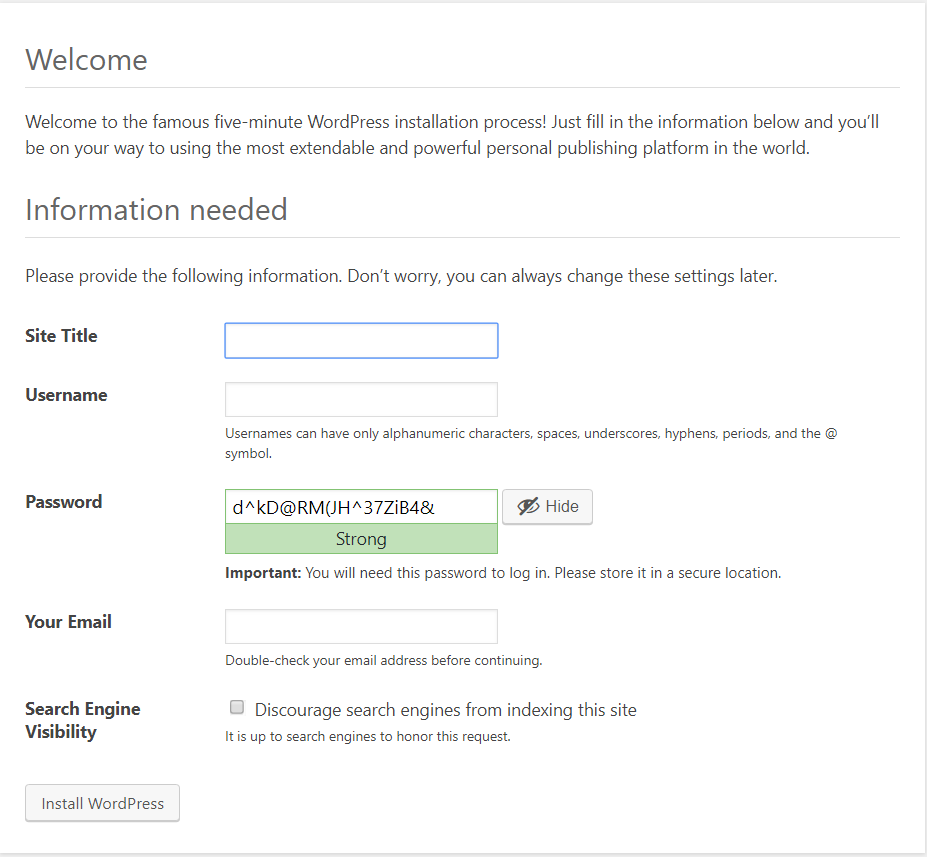
- Enter the required fields to finish the setup and login again.
When complete, WordPress is ready to use and you may now write a blog.
Scale the WordPress service
You can scale the WordPress service by adding additional replicas or containers running the WordPress frontend that processes incoming connections. For example, to have four replicas, use the command shown below.
$ kubectl scale deployments/wordpress --replicas=4
deployment.extensions/wordpress scaled
Check the pod status. There should be four WordPress replicas that were deployed across different nodes.
Please note that in this example, the master node was tainted to be schedulable, which means one replica was deployed to the master node.
$ kubectl taint nodes --all node-role.kubernetes.io/master-

$ kubectl get po -o wide
NAME                               READY   STATUS    RESTARTS   AGE   IP             NODE             NOMINATED NODE   READINESS GATES
nfs-provisioner-76957d5487-w4lss   1/1     Running   0          10m   10.244.1.174   clr-worker1   <none>           <none>
wordpress-866d67dc78-5gtzg         2/2     Running   0          8s    10.244.6.7     clr-worker2        <none>           <none>
wordpress-866d67dc78-96jxz         2/2     Running   0          8s    10.244.1.175   clr-worker1   <none>           <none>
wordpress-866d67dc78-lhd4x         2/2     Running   0          10m   10.244.6.5     clr-worker2        <none>           <none>
wordpress-866d67dc78-stsgd         2/2     Running   0          8s    10.244.0.244   clr-master          <none>           <none>
wordpress-mysql-6fbd666f76-xpb2l   1/1     Running   0          10m   10.244.6.6     clr-woker2       <none>           <none>
Congratulations!
Now you have a scalable WordPress instance.
Happy highly-available blogging!
As an alternative, all of the steps listed in the example above can be done in one step by using scripts. Refer to Clear Linux Dockerfiles WordPress on GitHub for details.
Measuring performance
After scaling with more replicas, performance is expected to improve. This section describes how to measure the performance change itself.
A simple test solution can be used as a reference, by using siege, an HTTP benchmarking tool, to run with replica as one and scaled to four for example. To avoid performance degradation by siege itself, run the test from a machine not joined in the Kubernetes cluster.
- Start with one replica by running these commands on the master node:
$ NodeIP==`kubectl get nodes -o \ jsonpath="{.items[0].status.addresses[0].address}"`

$ kubectl scale deployments/wordpress --replicas=1
- From a separate test machine, start a siege load test against the Kubernetes cluster:
$ siege -c 200 -t 1 -b http://$NodeIP:30180
- Repeat this test with replicas scaled to four using this command on the master node:
$ kubectl scale deployments/wordpress --replicas=4
- From the separate test machine in step 2, start a siege load test against the Kubernetes cluster:
$ siege -c 200 -t 1 -b http://$NodeIP:30180
Compare the siege test data in both replicas setting, one and four. Typically, performance is better with more replicas, but how much better can it be? It depends on many factors, including node machine performance, node machine numbers, internet speed, and throughput.
For example, a greater than 80% increase in the “throughput” by scaling from one to four was observed in one test environment. Try it in your environment.
Summary
This tutorial goes through a proof of concept on how to deploy a scalable WordPress on Kubernetes cluster with Clear Linux OS based containers. While it is an example, it provides insight into the scalability in the Kubernetes cluster design, while also utilizing Clear Linux OS-optimized containers for the workload.
- Download the Clear Linux* OS wordpress container image
- Learn more about Kubernetes on Clear Linux OS: