Remote-desktop to a host using VNC
This guide describes how to use VNC to connect to a remote Clear Linux* OS host.
VNC is a client-server GUI-based tool that allows you to connect via remote-desktop to your Clear Linux OS host.
Install the VNC server and misc. components on your host
To configure VNC to work on your Clear Linux OS host, install these bundles:
desktop-autostart: Installs GDM, sets it to start automatically on boot, and installs TigerVNC Viewer.
vnc-server: Installs the TigerVNC server.
Follow these steps:
Open a terminal window.
Install the Clear Linux OS bundles.
sudo swupd bundle-add desktop-autostart vnc-server
Reboot your Clear Linux OS host.
Configure a VNC-server-start method on your host
There are three methods you can use to configure and start the VNC server on your Clear Linux OS host:
Attribute |
Method 1: Manually start a VNC session |
Method 2: Automatically start a VNC session via a systemd service script |
Method 3: Create multi-user logins with authentication through GDM |
|---|---|---|---|
Description |
This is the traditional method where you SSH into the Clear Linux OS host, manually start a VNC session to get a display ID, and connect to it by supplying the display ID. |
The system administrator sets up a systemd service script for you with a pre-assigned display ID. You make a VNC connection and supply your pre-assigned display ID. |
The system administrator configures GDM to accept connection requests. When you make a VNC connection to the Clear Linux OS host, you see the GDM login screen and authenticate as if you are local. |
Who configures VNC settings? |
You |
System administrator |
System administrator |
Who starts VNC session? |
You |
Set to start automatically on boot by system administrator |
Set to start automatically on boot by system administrator |
Who ends VNC session? |
You |
You |
System administrator can disable VNC service altogether |
Requires VNC password to authenticate? |
Yes |
Yes |
No. Use Clear Linux OS account username and password through GDM |
Although all three methods can coexist on the same Clear Linux OS host, we recommend you pick a method that suits your needs.
For simplicity, the rest of this guide refers to these methods as Method 1, Method 2, and Method 3.
Method 1: Manually start a VNC session
You (and each user) must perform these steps to initialize your VNC settings.
Log in.
Open a terminal window.
Start VNC with the vncserver command. Since this is your first time starting VNC, it adds default configuration files and asks you to set a VNC password.
vncserver
Example output:
You will require a password to access your desktops.

Password:
Verify:
Would you like to enter a view-only password (y/n)? n
xauth:  file /home/vnc-user-a/.Xauthority does not exist

New 'clr-linux:2 (vnc-user-a)' desktop is clr-linux:2

Creating default startup script /home/vnc-user-a/.vnc/xstartup
Creating default config /home/vnc-user-a/.vnc/config
Starting applications specified in /home/vnc-user-a/.vnc/xstartup
Log file is /home/vnc-user-a/.vnc/clr-linux:2.log
Upon completion, you can find the default configuration files and the password file hidden in the
.vncdirectory in your home directory.A VNC session starts and shows a unique display ID, which is the number following the hostname and the colon “:”. In the above example, the display ID is 2. In a later step, you will supply the display ID to your VNC viewer app for connection.
Kill the active VNC session for the time being with the vncserver -kill :[display ID] command. Substitute [display ID] with your active VNC session display ID. For example:
vncserver -kill :2
Note
If you do not recall the active session display ID, use the vncserver -list command to find it.
Optional configurations:
To customize settings such as screen size, security type, etc., modify the
$HOME/.vnc/configfile.To customize the applications to run at startup, modify the
$HOME/.vnc/xstartupfile.
Method 2: Automatically start a VNC session via a systemd service script
To configure VNC for this method, you must have root privileges. You will set up a systemd service file for all intended VNC users with their own preassigned unique display ID.
Log in.
Make sure the user accounts already exist. Use the following command to list all users.
sudo cut -d: -f1 /etc/passwd
Create the path
/etc/systemd/system.sudo mkdir -p /etc/systemd/system
Create a systemd service script file
vncserver@:[X].service, where [X] is the display ID, for each user in/etc/systemd/systemEach user must be assigned a unique display ID. Be sure the correct username is entered in the User field. The example below shows user vnc-user-b who is assigned the display ID 5.sudo tee -a /etc/systemd/system/vncserver@:5.service << EOF [Unit] Description=VNC Remote Desktop Service for "vnc-user-b" with display ID "5" After=syslog.target network.target [Service] Type=simple User=vnc-user-b PAMName=login PIDFile=/home/%u/.vnc/%H%i.pid ExecStartPre=/bin/sh -c '/usr/bin/vncserver -kill %i > /dev/null 2>&1 || :' ExecStart=/usr/bin/vncserver %i -geometry 2000x1200 -alwaysshared -fg ExecStop=/usr/bin/vncserver -kill %i [Install] WantedBy=multi-user.target EOF
Have each user log into their account and set a VNC password with the vncpasswd command before proceeding to the next step.
Start the VNC service script and set it to start automatically on boot for each user. Replace the [X] with the display ID.
sudo systemctl daemon-reload
sudo systemctl enable vncserver@:[X].service
sudo systemctl start vncserver@:[X].service
After starting the services, verify they are running.
systemctl | grep vnc
The example below shows 2 VNC sessions that were successfully started for users vnc-user-b with display ID 5 and vnc-user-c with display ID 6.
systemctl | grep vnc

vncserver@:5.services   loaded active running  VNC Remote Desktop Service for "vnc-user-b" with display ID "5"
vncserver@:6.services   loaded active running  VNC Remote Desktop Service for "vnc-user-c" with display ID "6"
system-vncserver.slice  loaded active active system-vncserver.slice
Method 3: Multi-user logins with authentication through GDM
For this method, VNC is configured as a systemd service that listens on port 5900 and GDM is configured to accept access requests from VNC. When you make a VNC connection to your Clear Linux OS host, you are presented with the GDM login screen and you authenticate as if you are local. You must have root privileges to perform this configuration.
Log in.
Create the path
/etc/systemd/system.sudo mkdir -p /etc/systemd/system
Create a systemd socket file
xvnc.socketwith the following content:sudo tee -a /etc/systemd/system/xvnc.socket << EOF [Unit] Description=XVNC Server on port 5900 [Socket] ListenStream=5900 Accept=yes [Install] WantedBy=sockets.target EOF
Create a systemd service file
xvnc@.servicewith the following content:sudo tee -a /etc/systemd/system/xvnc@.service << EOF [Unit] Description=Daemon for each XVNC connection [Service] ExecStart=-/usr/bin/Xvnc -inetd -query localhost -geometry 2000x1200 -once -SecurityTypes=None User=nobody StandardInput=socket StandardError=syslog EOF
Create the path
/etc/gdm.sudo mkdir -p /etc/gdm
Create a GDM
custom.conffile with the following content:sudo tee -a /etc/gdm/custom.conf << EOF [xdmcp] Enable=true Port=177 EOF
Start the VNC socket script and set it to start automatically on boot.
sudo systemctl daemon-reload
sudo systemctl enable xvnc.socket
sudo systemctl start xvnc.socket
After starting the socket, verify it is running.
systemctl | grep vnc
The example below shows the xvnc.socket is running.
systemctl | grep vnc

xvnc.socket               loaded active listening XVNC Server on port 5900
system-xvnc.slice         loaded active active    system-xvnc.slice
See the vncserver Man page for additional information.
Install a VNC viewer app and an SSH client on your client system
You need a VNC viewer app on your client system to connect to your Clear Linux OS host. An SSH client is only needed if you chose to use Method 1 or you plan to encrypt your VNC traffic, which is discussed later in this guide.
Perform the steps below to add these apps to your client system.
Install a VNC viewer app
On Clear Linux OS:
sudo swupd bundle-add desktop-autostart
On Ubuntu*, Mint*:
sudo apt-get install xtightvncviewer
On Fedora*:
sudo dnf install tigervnc
On Windows*:
Install RealVNC for Windows
On macOS*:
Install RealVNC for macOS
Install an SSH client
On most Linux distros (Clear Linux OS, Ubuntu, Mint, Fedora, etc.) and macOS, SSH is built-in so you don’t need to install it.
On Windows, you can install Putty.
Establish a VNC connection to your host
Depending on the VNC-server-configuration method chosen, use the appropriate VNC connection:
If you chose Method 1, you must take a few extra steps by using SSH to connect to your Clear Linux OS host and then manually launching VNC.
If you chose Method 2, get your preassigned VNC display ID from your system administrator first and then proceed to the Connect to your VNC session section below.
If you chose Method 3, proceed to the Connect to your VNC session below.
SSH into your host and launch VNC
SSH into your Clear Linux OS host
On Linux distros and macOS:
ssh [username]@[clear-linux-host-ip-address]
On Windows:
Launch Putty.
Under the Category section, select Session. See Figure 1.
Enter the IP address of your Clear Linux OS host in the Host Name (or IP address) field.
Set the Connection type option to SSH.
Click the Open button.
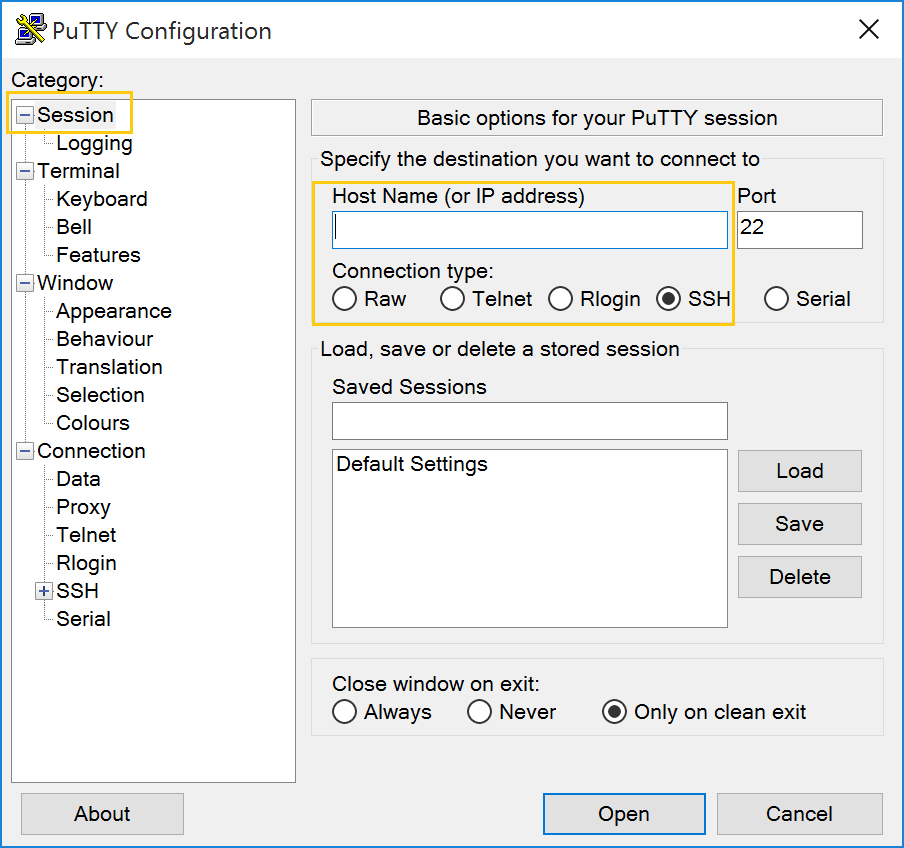
Figure 1: Putty - configure SSH session settings
Log in with your Clear Linux OS username and password. Do not use your VNC password.
Start a VNC session.
vncserver
Example output:
New 'clr-linux:3 (vnc-user-c)' desktop is clr-linux:3

Starting applications specified in /home/vnc-user-c/.vnc/xstartup
Log file is /home/vnc-user-c/.vnc/clr-linux:3.log
Take note of the generated display ID because you will input it into the VNC viewer app to establish the connection. The above example shows the display ID is 3.
Note
VNC automatically picks a unique display ID unless you specify one. To specify a display ID, enter a unique number that is not already in use after the colon. For example:
vncserver :8You can now end the SSH connection by logging out. This does not terminate your active VNC session.
Connect to your VNC session
For Method 1 and Method 2, you must connect to a specific active session or display ID using one of two options:
Use a fully-qualified VNC port number, which consists of the default VNC server port (5900) plus the display ID
Use the display ID
For example, if the display ID is 3, it can be specified as 5903 or just as 3. For Method 3, VNC does not expect a display ID. Use 5900. For simplicity, the instructions below use the fully-qualified VNC port number.
On Linux distros:
Open a terminal window and enter:
vncviewer [clear-linux-host-ip-address]:[fully-qualified VNC port number]
Enter your credentials.
For Method 1 and Method 2, enter your VNC password. No username is required.
For Method 3, enter your Clear Linux OS account username and password through GDM.
Note
With Method 3, you cannot remotely log into your Clear Linux OS host through VNC if you are logged in locally and vice versa.
On Windows and macOS using RealVNC app:
Start the RealVNC viewer app. See Figure 2.
Enter the IP address of the Clear Linux OS host and the fully-qualified VNC port number.
The following screenshot shows connecting to Clear Linux OS host 192.168.25.54 with a fully-qualified VNC port number 5902.
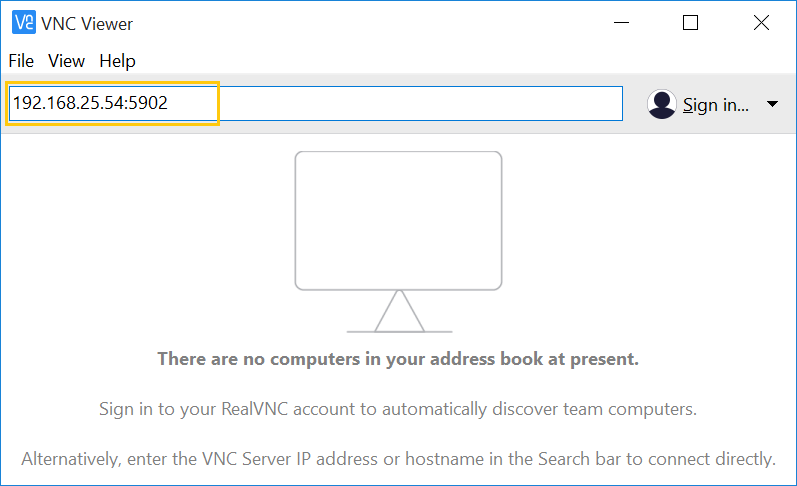
Figure 2: RealVNC Viewer
Press the Enter key.
Enter your credentials.
For Method 1 and Method 2, enter your VNC password. No username is required.
For Method 3, enter your Clear Linux OS account username and password through GDM.
Note
With Method 3, you cannot remotely log into your Clear Linux OS host through VNC if you are logged in locally and vice versa.
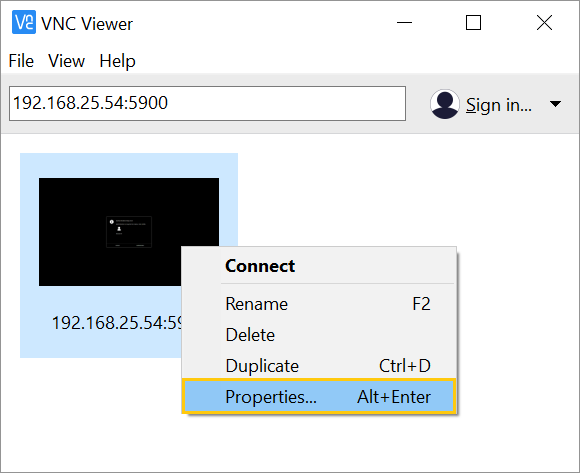
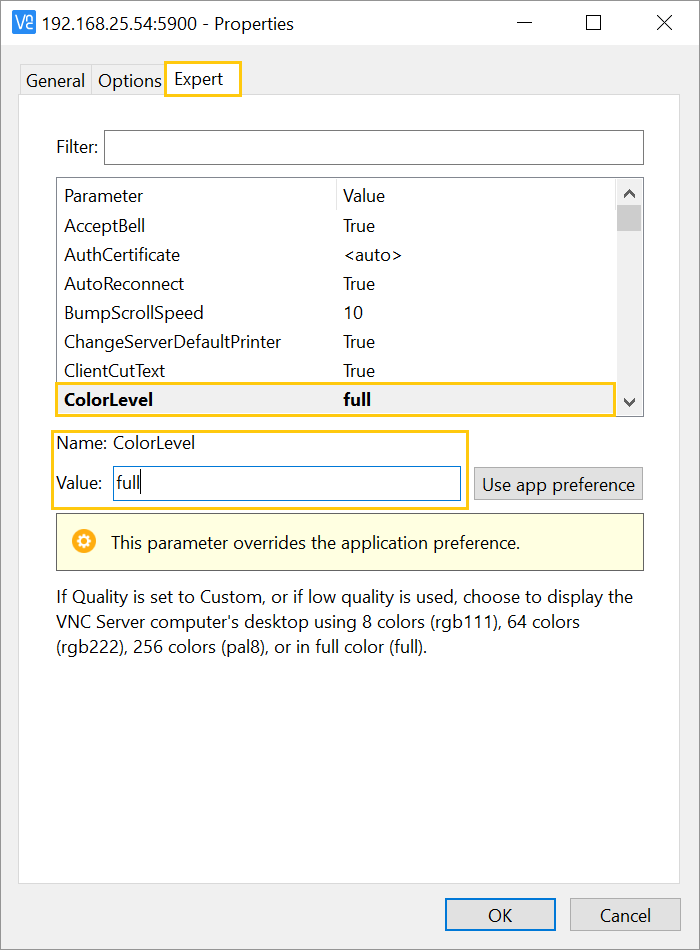
Optional: Configure RealVNC Image Quality
To increase the RealVNC viewer image quality, manually change the ColorLevel value. Follow these steps:
Terminate a VNC connection to your host
For Method 1 and Method 2, once started, a VNC session remains active on your Clear Linux OS host even if you close your VNC viewer app. If you want to truly terminate an active VNC session, follow these steps:
SSH into your Clear Linux OS host.
Open a terminal window.
Find the active VNC session display ID with the command vncserver -list.
vncserver -listTerminate it with the vncserver -kill command followed by a colon and the display ID.
vncserver -kill :[display ID]
For Method 3, only the system administrator can stop and disable the VNC service by using these commands:
sudo systemctl stop xvnc.socket
sudo systemctl disable xnvc.socket
Encrypt VNC traffic through an SSH tunnel
By default, VNC traffic is not encrypted. Figure 5 shows an example warning from RealVNC Viewer.
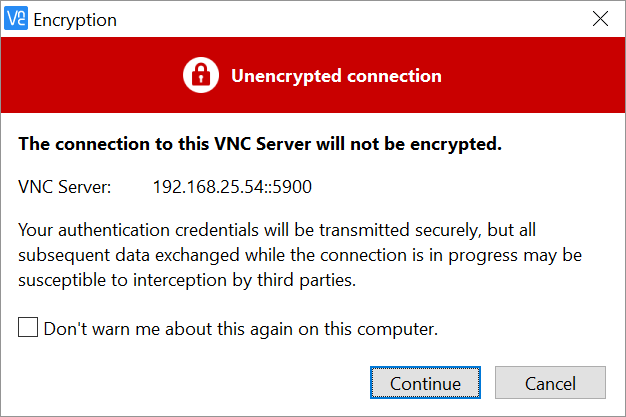
Figure 5: RealVNC Viewer - Connection not encrypted warning
To add security, VNC traffic can be routed through an SSH tunnel. This is accomplished by following these steps:
Configure the VNC server to only accept connection from localhost by adding the -localhost option.
Set up an SSH tunnel between your client system and your Clear Linux OS host. Your client system will forward traffic from the localhost (the client) destined for a specified fully-qualified VNC port number (on the client) to your Clear Linux OS host with the same port number.
The VNC viewer app on your client system will now connect to localhost, instead of the IP address of your Clear Linux OS host.
Configure VNC to only accept connection from localhost
For Method 1:
Edit the
configfile located in$HOME/.vncand uncomment the # localhost line. It should look like this:## Supported server options to pass to vncserver upon invocation can be listed ## in this file. See the following manpages for more: vncserver(1) Xvnc(1). ## Several common ones are shown below. Uncomment and modify to your liking. ## # securitytypes=vncauth,tlsvnc # desktop=sandbox # geometry=2000x1200 localhost # alwaysshared
If an active session exists, kill it, and then restart it.
For Method 2:
Edit the systemd service script
vncserver@:[X].servicelocated in/etc/systemd/systemand add -localhost to the ExecStart line. The example below uses vncserver@:5.service:[Unit] Description=VNC Remote Desktop Service for "vnc-user-b" with display ID "5" After=syslog.target network.target [Service] Type=simple User=vnc-user-b PAMName=login PIDFile=/home/%u/.vnc/%H%i.pid ExecStartPre=/bin/sh -c '/usr/bin/vncserver -kill %i > /dev/null 2>&1 || :' ExecStart=/usr/bin/vncserver %i -geometry 2000x1200 -localhost -alwaysshared -fg ExecStop=/usr/bin/vncserver -kill %i [Install] WantedBy=multi-user.target
Restart the service script:
sudo systemctl daemon-reload
sudo systemctl restart vncserver@:5.service
For Method 3:
No change is needed to the
xvnc@servicescript.After you have restarted your VNC session, you can verify that it only accepts connections from localhost by using the netstat command like this:
netstat -plantNote
Add the Clear Linux OS network-basic bundle to get the netstat command.
Figure 6 shows two VNC sessions (5901 and 5905) accepting connections from any host as specified by the 0.0.0.0’s. This is before the -localhost option was used.

Figure 6: VNC sessions (5901 and 5905) accepting connections from any host
Figure 7 shows two VNC sessions (5901 and 5905) only accepting connections from localhost as specified by 127.0.0.1’s. This is after the -localhost option was used.

Figure 7: VNC sessions (5901 and 5905) only accepting connections from localhost
Set up an SSH tunnel from your client system to your Clear Linux OS host
On Linux distros and macOS:
Open terminal window and enter:
ssh -L [client port number]:localhost:[fully-qualified VNC port number] \
-N -f -l [username] [clear-linux-host-ip-address]
Enter your Clear Linux OS account password (not your VNC password).
Note
-L specifies that [client port number] on the localhost (on the client side) is forwarded to [fully-qualified VNC port number] (on the server side).
Replace [client port number] with an available client port number (for example: 1234). For simplicity, you can make the [client port number] the same as the [fully-qualified VNC port number].
Replace [fully-qualified VNC port number] with 5900 (default VNC port) plus the display ID. For example, if the display ID is 2, the fully-qualified VNC port number is is 5902.
-N tells SSH to only forward ports and not execute a remote command.
-f tells SSH to go into the background before command execution.
-l specifies the username to log in as.
On Windows:
Launch Putty.
Specify the Clear Linux OS VNC host to connect to.
Under the Category section, select Session. See Figure 1.
Enter the IP address of your Clear Linux OS host in the Host Name (or IP address) field.
Set the Connection type option to SSH.
Configure the SSH tunnel. See Figure 8 for an example.
Under the Category section, go to Connection > SSH > Tunnels.
In the Source port field, enter an available client port number (for example: 1234). For simplicity, you can make the Source port the same as the fully-qualified VNC port number.
In the Destination field, enter localhost: plus the fully-qualified VNC port number.
Click the Add button.
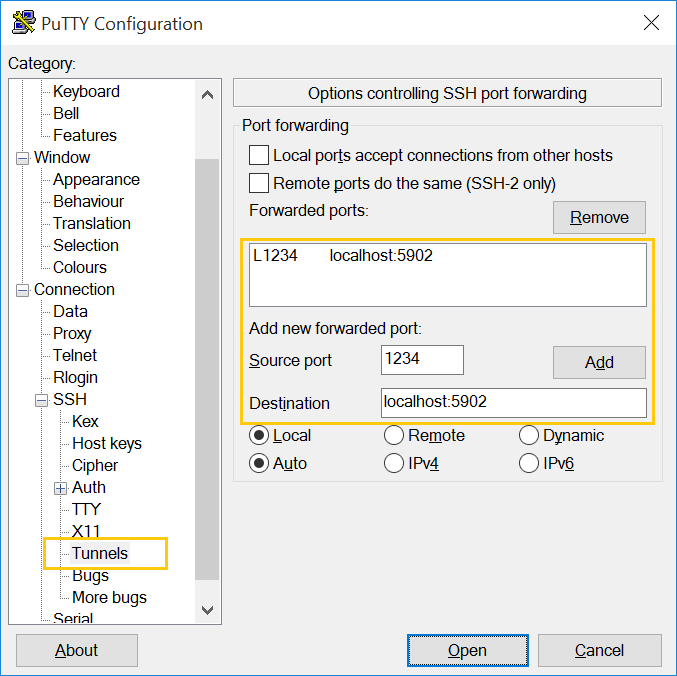
Figure 8: Putty - configure SSH tunnel
Click the Open button.
Enter your Clear Linux OS account password (not your VNC password).
Connect to a VNC session through an SSH tunnel
After you have set up an SSH tunnel, follow these instructions to connect to your VNC session.
On Linux distros:
Open terminal window and enter:
vncviewer localhost:[client port number]
On Windows and macOS using `RealVNC`:
Start the RealVNC viewer app.
Enter localhost and the fully-qualified VNC port number. See Figure 9 for an example.
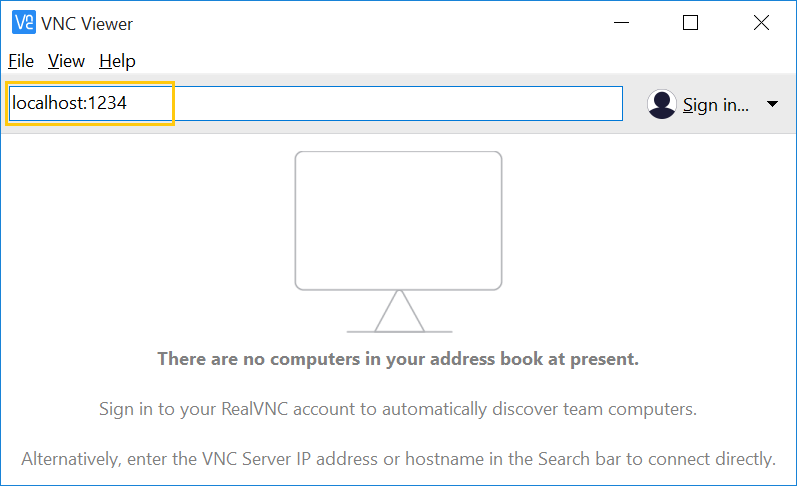
Figure 9: RealVNC viewer app connecting to localhost:1234
Note
RealVNC will still warn that the connection is not encrypted even though its traffic is going through the SSH tunnel. You can ignore this warning.