Install Clear Linux OS Over the Network with iPXE
PXE PXE is an industry standard that describes client-server interaction with network-boot software and uses the DHCP and TFTP protocols. iPXE, a fork of gPXE, is an open-source version of PXE. It enables computers without built-in PXE capability to network-boot using protocols such as HTTP, iSCSI, AoE, and FCoE.
This guide demonstrates how to setup an iPXE server to install Clear Linux* OS over the network.
Figure 1 depicts the flow of information between an iPXE server and a PXE client.
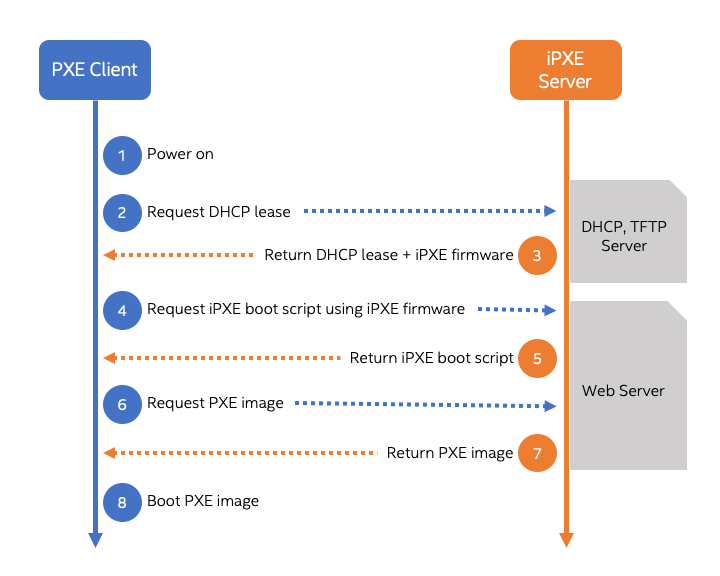
Figure 1: PXE information flow
Caution
The Clear Linux OS PXE image that boots through the iPXE process automatically erases all data and partitions on the PXE client system and performs a fresh installation according to a clr-installer YAML configuration file.
Prerequisites
Your iPXE server must have:
Ethernet/LAN boot option
At least two network adapters
Connection to a public (WAN) network
Secure Boot option disabled in BIOS
Your clients must have:
Ethernet/LAN boot option
One network adapter
Secure Boot option disabled in BIOS
The minimum requirements to run Clear Linux OS. Review the Check Processor Compatibility.
Connect the iPXE server and clients to a network switch on a private (LAN) network, as shown in Figure 2.
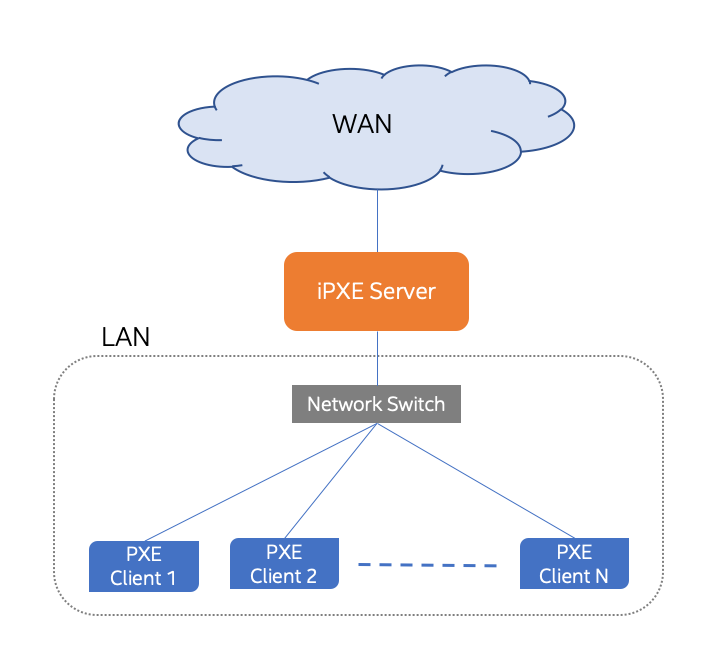
Figure 2: Network topology
Install Clear Linux OS on server
Install Clear Linux OS on the system that will serve as the iPXE server. We recommend using the server version.
Open a terminal window.
Add the pxe-server bundle to your Clear Linux OS system. The bundle contains all the necessary apps (web server, iPXE firmwares, dnsmasq which provides TFTP, DNS, DHCP functionalities) to run an iPXE server.
sudo swupd bundle-add pxe-server
Define the following variables used for setting up the iPXE server. Be sure to substitute the value for the WAN_INTERFACE and LAN_INTERFACE variables with your LAN and WAN interfaces names. Use ip a to list your network devices and get their names.
IPXE_APP_NAME=ipxe
IPXE_PORT=50000
WEB_ROOT_DIR=/var/www
IPXE_ROOT_DIR=${WEB_ROOT_DIR}/${IPXE_APP_NAME}
TFTP_ROOT_DIR=/srv/tftp
CLR_INSTALLER_CONF_DIR=clr-installer-configs
WAN_INTERFACE=eno1
LAN_INTERFACE=eno2
IPXE_SUBNET=192.168.100
IPXE_LAN_IP=${IPXE_SUBNET}.1
IPXE_SUBNET_MASK_IP=255.255.255.0
IPXE_SUBNET_BITMASK=16
Setup nginx web server to host iPXE
Set up an nginx web server to serve the Clear Linux OS PXE image to clients using these steps:
# setup nginx
sudo mkdir -p /etc/nginx/conf.d
sudo cp /usr/share/nginx/conf/nginx.conf.example /etc/nginx/nginx.conf

# grant $USER permission to run the web server
sudo tee -a /etc/nginx/nginx.conf << EOF
user $USER;
EOF

# web server config
sudo tee -a /etc/nginx/conf.d/${IPXE_APP_NAME}.conf << EOF
server {
  listen ${IPXE_PORT};
  server_name localhost;

  # directory to store ipxe
  location /${IPXE_APP_NAME}/ {
    root ${WEB_ROOT_DIR}/${IPXE_APP_NAME};
    rewrite ^/${IPXE_APP_NAME}(/.*)$ \$1 break;
  }

  # directory to store clr-installer configs
  location /${CLR_INSTALLER_CONF_DIR}/ {
    root ${WEB_ROOT_DIR}/${CLR_INSTALLER_CONF_DIR};
    rewrite ^/${CLR_INSTALLER_CONF_DIR}(/.*)$ \$1 break;
  }
}
EOF
Set nginx to start automatically on boot and then start it.
sudo systemctl enable nginx --now
Configure iPXE
Download the latest Clear Linux OS PXE image and extract the files into the iPXE root.
sudo curl -o /tmp/clear-pxe.tar.xz \
  https://cdn.download.clearlinux.org/current/clear-$(curl \
  https://cdn.download.clearlinux.org/latest)-pxe.tar.xz
sudo mkdir -p ${IPXE_ROOT_DIR}
sudo tar -xJf /tmp/clear-pxe.tar.xz -C ${IPXE_ROOT_DIR}
sudo ln -sf $(ls ${IPXE_ROOT_DIR} | grep 'org.clearlinux.*') ${IPXE_ROOT_DIR}/linux
Note
Ensure that the initial ramdisk file is named
initrdand the kernel file is namedlinux, which is a symbolic link to the actual kernel file.Create an iPXE boot script. The script presents a menu of bootable images to download, boot, and install Clear Linux OS, according to a designated clr-installer YAML configuration file.
sudo tee -a ${IPXE_ROOT_DIR}/ipxe_boot_script.ipxe << EOF
#!ipxe

set menu-timeout 5000
set submenu-timeout \${menu-timeout}
isset \${menu-default} || set menu-default clr-server

:menu
menu Select a version of Clear Linux OS to install
item clr-desktop Clear Linux OS (Desktop)
item clr-server Clear Linux OS (Server)
item ipxe-shell iPXE Shell
item reboot Reboot

choose --timeout \${menu-timeout} --default \${menu-default} selected || goto cancel
set menu-timeout 0
goto \${selected}

:clr-desktop
echo Booting and installing Clear Linux OS (Desktop)...
kernel linux quiet init=/usr/lib/systemd/systemd-bootchart initcall_debug \\
tsc=reliable no_timer_check noreplace-smp rw initrd=initrd \\
clri.descriptor=http://${IPXE_LAN_IP}:${IPXE_PORT}/${CLR_INSTALLER_CONF_DIR}/clr-desktop.yaml
initrd initrd
boot || goto failed

:clr-server
echo Booting and installing Clear Linux OS (Server)...
kernel linux quiet init=/usr/lib/systemd/systemd-bootchart initcall_debug \\
tsc=reliable no_timer_check noreplace-smp rw initrd=initrd \\
clri.descriptor=http://${IPXE_LAN_IP}:${IPXE_PORT}/${CLR_INSTALLER_CONF_DIR}/clr-server.yaml
initrd initrd
boot || goto failed

:cancel
echo Menu canceled, going to iPXE shell

:ipxe-shell
echo Type 'exit' to return to the menu
shell
set menu-timeout 0
set submenu-timeout 0
goto menu

echo Booting
:failed
echo Booting failed, going to iPXE shell
goto shell

:reboot
echo Rebooting...
sleep 1
reboot
EOF
Note
The clri.discriptor option tells clr-installer where to download a YAML configuration file to use. Without this option, the Clear Linux OS PXE image will simply boot and not perform any installation.
Add clr-installer YAML configuration files
After the Clear Linux OS PXE image boot, clr-installer downloads the YAML configuration file specified in the kernel command-line and installs accordingly.
See Installer YAML Syntax for more information on clr-installer configuration YAML syntax.
Create the directory to store the configuration files.
sudo mkdir -p ${WEB_ROOT_DIR}/${CLR_INSTALLER_CONF_DIR}
Create this sample Desktop configuration called
clr-desktop.yaml.sudo tee -a ${WEB_ROOT_DIR}/${CLR_INSTALLER_CONF_DIR}/clr-desktop.yaml << EOF #clear-linux-config # switch between aliases if you want to install to an actuall block device # i.e /dev/sda block-devices: [ {name: "bdevice", file: "/dev/sda"} ] targetMedia: - name: \${bdevice} type: disk children: - name: \${bdevice}1 fstype: vfat mountpoint: /boot size: "150M" type: part - name: \${bdevice}2 fstype: swap size: "250M" type: part - name: \${bdevice}3 fstype: ext4 mountpoint: / size: "0" # Use remaining disk space type: part bundles: [ bootloader, os-core, os-core-update, desktop-autostart, libreoffice, vlc, c-basic, git, openssh-server, vim ] autoUpdate: true postArchive: false postReboot: true telemetry: false hostname: clrlinux-desktop keyboard: us language: en_US.UTF-8 kernel: kernel-native users: - login: clrlinux username: Clear Linux # Password is "clear123" password: $6$SJJMfnInWQg.CvMA$m2F8dJGj71zvi9mSNMktHMsPH3qhBm8pgXDNdaBe2yFfgi479JXvEqWkvQ6OxIUgGNQ5YXFIF0tCn.hEXB90G/ admin: true - login: root username: Root Root # Password is "clear123" password: $6$SJJMfnInWQg.CvMA$m2F8dJGj71zvi9mSNMktHMsPH3qhBm8pgXDNdaBe2yFfgi479JXvEqWkvQ6OxIUgGNQ5YXFIF0tCn.hEXB90G/ admin: true pre-install: [ {cmd: "curl -o /tmp/add-issue.sh http://${IPXE_LAN_IP}:${IPXE_PORT}/${CLR_INSTALLER_CONF_DIR}/add-issue.sh"}, {cmd: "chmod +x /tmp/add-issue.sh"} ] post-install: [ {cmd: "echo PermitRootLogin yes > \${chrootDir}/etc/ssh/sshd_config"}, {cmd: "/tmp/add-issue.sh \${chrootDir}"} ] EOF
Create this sample Server configuration called
clr-server.yaml.sudo tee -a ${WEB_ROOT_DIR}/${CLR_INSTALLER_CONF_DIR}/clr-server.yaml << EOF #clear-linux-config # switch between aliases if you want to install to an actuall block device # i.e /dev/sda block-devices: [ {name: "bdevice", file: "/dev/sda"} ] targetMedia: - name: \${bdevice} type: disk children: - name: \${bdevice}1 fstype: vfat mountpoint: /boot size: "150M" type: part - name: \${bdevice}2 fstype: swap size: "250M" type: part - name: \${bdevice}3 fstype: ext4 mountpoint: / size: "0" # Use remaining disk space type: part bundles: [ bootloader, os-core, os-core-update, vim ] autoUpdate: true postArchive: false postReboot: true telemetry: false hostname: clrlinux-server keyboard: us language: en_US.UTF-8 kernel: kernel-native users: - login: clrlinux username: Clear Linux # Password is "clear123" password: \$6\$SJJMfnInWQg.CvMA\$m2F8dJGj71zvi9mSNMktHMsPH3qhBm8pgXDNdaBe2yFfgi479JXvEqWkvQ6OxIUgGNQ5YXFIF0tCn.hEXB90G/ admin: true - login: root username: Root Root # Password is "clear123" password: \$6\$SJJMfnInWQg.CvMA\$m2F8dJGj71zvi9mSNMktHMsPH3qhBm8pgXDNdaBe2yFfgi479JXvEqWkvQ6OxIUgGNQ5YXFIF0tCn.hEXB90G/ admin: true pre-install: [ {cmd: "curl -o /tmp/add-issue.sh http://${IPXE_LAN_IP}:${IPXE_PORT}/${CLR_INSTALLER_CONF_DIR}/add-issue.sh"}, {cmd: "chmod +x /tmp/add-issue.sh"} ] post-install: [ {cmd: "echo PermitRootLogin yes > \${chrootDir}/etc/ssh/sshd_config"}, {cmd: "/tmp/add-issue.sh \${chrootDir}"} ] EOF
Add following content to the
add-issue.shscript, which will be used by the above two YAML configuration files:sudo tee -a ${WEB_ROOT_DIR}/${CLR_INSTALLER_CONF_DIR}/add-issue.sh << EOF #!/bin/bash echo "Creating custom issue file for \$1" echo "Welcome to the Clear Linux* OS * Documentation: https://clearlinux.org/documentation * Community Support: https://community.clearlinux.org " >> \$1/etc/issue exit 0 EOF
Configure network
The DNS server, included with the pxe-server bundle, conflicts with the DNS stub listener provided in systemd-resolved. Disable the DNS stub listener and temporarily stop systemd-resolved.
sudo mkdir -p /etc/systemd
sudo tee -a /etc/systemd/resolved.conf << EOF
[Resolve]
DNSStubListener=no
EOF

sudo systemctl stop systemd-resolved
Disable NetworkManager. The base installation of Clear Linux OS comes with two network managers, systemd-networkd and NetworkManager, with the latter being the default. systemd-networkd is recommended for a server use case, so we will disable NetworkManager.
sudo systemctl mask --now NetworkManager
Assign a static IP address to the LAN side network adapter and restart systemd-networkd.
sudo mkdir -p /etc/systemd/network
sudo tee -a /etc/systemd/network/70-internal-static.network << EOF
[Match]
Name=${LAN_INTERFACE}
[Network]
DHCP=no
Address=${IPXE_LAN_IP}/${IPXE_SUBNET_BITMASK}
EOF

sudo systemctl enable systemd-networkd
sudo systemctl restart systemd-networkd
Setup NAT
Configure NAT to route traffic from the LAN to the WAN network so clients can download upstream bundles for installation. And to make these changes persistent during reboots, save the changes to the firewall.
sudo iptables -t nat -F POSTROUTING
sudo iptables -t nat -A POSTROUTING -o ${WAN_INTERFACE} -j MASQUERADE
sudo systemctl enable iptables-save.service
sudo systemctl restart iptables-save.service
sudo systemctl enable iptables-restore.service
sudo systemctl restart iptables-restore.service
Configure the kernel to forward network packets to different interfaces. Otherwise, NAT will not work.
sudo mkdir -p /etc/sysctl.d
sudo tee -a /etc/sysctl.d/80-nat-forwarding.conf << EOF
net.ipv4.ip_forward=1
EOF

sudo tee -a /proc/sys/net/ipv4/ip_forward << EOF
1
EOF
Setup dnsmaq for DHCP, DNS, and TFTP functionalities
Create a configuration file for dnsmasq to listen on a dedicated IP address for TFTP, DNS, and DHCP functions. PXE clients on the LAN network will talk to this IP address.
sudo tee -a /etc/dnsmasq.conf << EOF
listen-address=${IPXE_LAN_IP}
EOF
Add the options to serve iPXE firmware images to clients over TFTP to the
dnsmasqconfiguration file.sudo tee -a /etc/dnsmasq.conf << EOF enable-tftp tftp-root=${TFTP_ROOT_DIR} EOF
Add the options to host a DHCP server for clients to the
dnsmasqconfiguration file.sudo tee -a /etc/dnsmasq.conf << EOF dhcp-leasefile=/var/db/dnsmasq.leases dhcp-authoritative dhcp-option=option:router,${IPXE_LAN_IP} dhcp-option=option:dns-server,${IPXE_LAN_IP} dhcp-match=set:ipxeclient,60,IPXEClient* dhcp-range=tag:ipxeclient,${IPXE_SUBNET}.2,${IPXE_SUBNET}.253,${IPXE_SUBNET_MASK_IP},15m dhcp-range=tag:!ipxeclient,${IPXE_SUBNET}.2,${IPXE_SUBNET}.253,${IPXE_SUBNET_MASK_IP},6h dhcp-match=set:ipxeboot,175 dhcp-boot=tag:ipxeboot,http://${IPXE_LAN_IP}:${IPXE_PORT}/${IPXE_APP_NAME}/ipxe_boot_script.ipxe dhcp-boot=tag:!ipxeboot,undionly.kpxe,${IPXE_LAN_IP} EOF
The configuration provides the following important functions:
Directs clients without an iPXE implementation to the TFTP server to acquire architecture-specific iPXE firmware images that allow them to perform an iPXE boot.
Activates only on the network adapter that has an IP address on the defined subnet.
Directs clients to the DNS server.
Directs clients to the iPXE server for routing via NAT.
Divides the private network into two pools of IP addresses. One pool is for network boot and one pool is used after boot. Each pool has their own lease times.
Create a file for dnsmasq to record the IP addresses it provides to clients.
sudo mkdir -p /var/db
sudo touch /var/db/dnsmasq.leases
Create a TFTP hosting directory and populate it with the iPXE firmware.
sudo mkdir -p ${TFTP_ROOT_DIR}
sudo ln -sf /usr/share/ipxe/undionly.kpxe ${TFTP_ROOT_DIR}/undionly.kpxe
Start dnsmasq and enable startup on boot.
sudo systemctl daemon-reload
sudo systemctl enable dnsmasq
sudo systemctl restart dnsmasq
Start systemd-resolved.
sudo systemctl start systemd-resolved
Note
systemd-resolved dynamically updates the list of DNS servers for the LAN network if you use the dnsmasq DNS server. The setup creates a pass-through DNS server that relies on the DNS servers listed in
/etc/resolv.conf.
Verify setup
Verify you can access these URLs before deploying:
http://{$IPXE_LAN_IP}:{$IPXE_PORT}/${IPXE_APP_NAME}/ipxe_boot_script.ipxe
http://{$IPXE_LAN_IP}:{$IPXE_PORT}/${CLR_INSTALLER_CONF_DIR}/clr-desktop.yaml
http://{$IPXE_LAN_IP}:{$IPXE_PORT}/${CLR_INSTALLER_CONF_DIR}/clr-server.yaml
http://{$IPXE_LAN_IP}:{$IPXE_PORT}/${CLR_INSTALLER_CONF_DIR}/add-issue.sh
Deploy
Connect your client system to the LAN network.
Power on the client.
Set your client to network boot. It should get an IP address and download the iPXE script.
When presented with the iPXE menu, select one of the options. The client will then download and boot the Clear Linux OS image. Once booted, clr-installer will download the assigned YAML configuration file and begin to install Clear Linux OS. After installation, the client will reboot to Clear Linux OS.